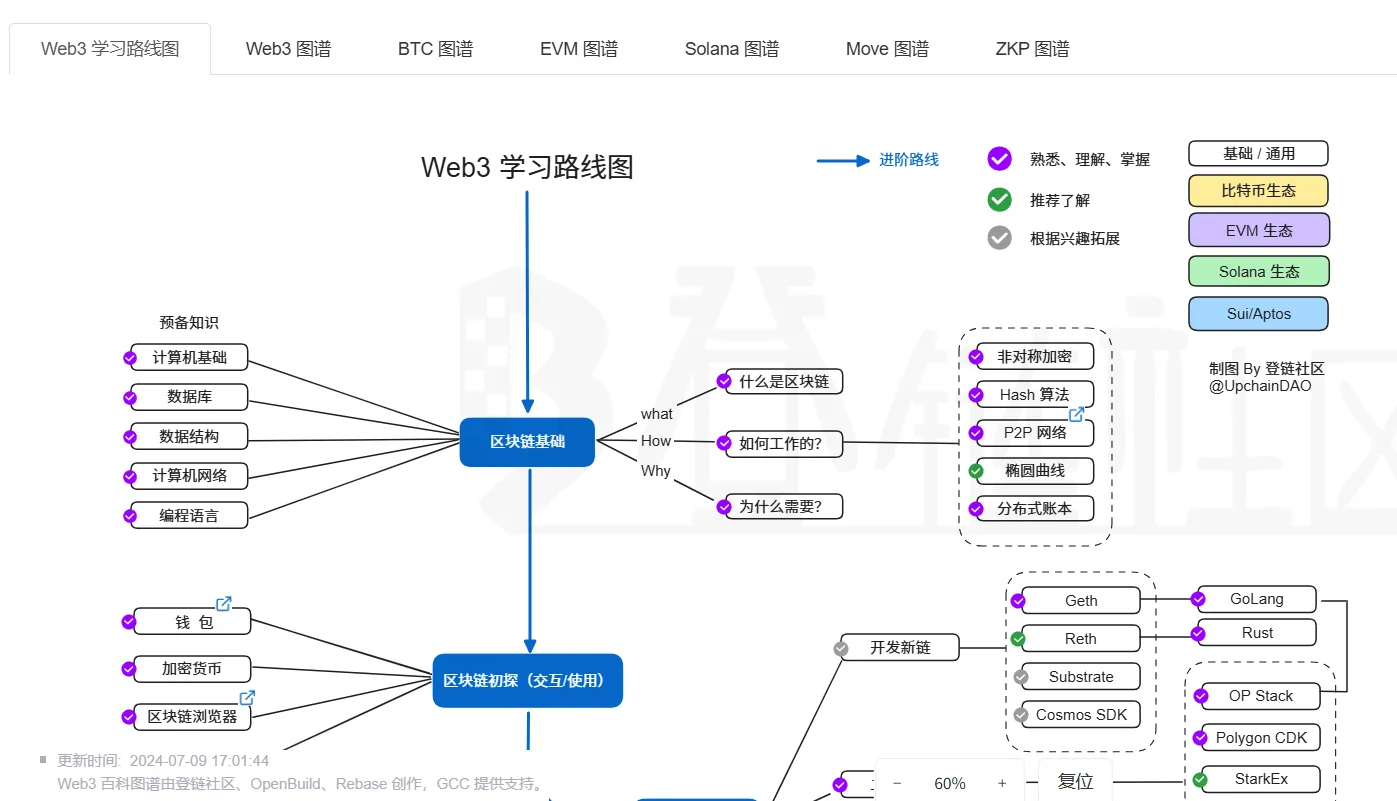
Web 3 学习路线图
https://learnblockchain.cn/maps/Roadmap
检测浏览器的巧妙方法
通常,我们检测浏览器是通过获取 navigator.userAgent,但 ua 是可以通过浏览器设置或浏览器插件人为更改的,这种方法就不够准确。
这里推荐两个巧妙的方法:
ComputedStyle 检测 CSS 前缀
参考:https://davidwalsh.name/vendor-prefix
  /**
 * 获取所有 ComputedStyle 检测 CSS 前缀
 */
function detectBrowserByComputedStyle() {
  const computedStyle = window.getComputedStyle(document.documentElement, '')
  const prefix = Array.prototype.slice.call(computedStyle).join('').match(/-(moz|webkit|ms)-/)[1]
  return {
    webkit: prefix === 'webkit',
    moz: prefix === 'moz',
    ms: prefix === 'ms',
    o: prefix === 'o',
  }
}
检测 js 的相关功能
参考:https://stackoverflow.com/questions/9847580/how-to-detect-safari-chrome-ie-firefox-and-opera-browsers/9851769
  /**
 * 通过 feature 检测浏览器
 */
function detectBrowserByFeature() {
  // Opera 8.0+
  const isOpera = (!!window.opr && !!opr.addons) || !!window.opera || navigator.userAgent.indexOf(' OPR/') >= 0
  // Firefox 1.0+
  const isFirefox = typeof InstallTrigger !== 'undefined'
  // Safari 3.0+
  const isSafari = /constructor/i.test(window.HTMLElement)
    || ((typeof safari !== 'undefined' && window['safari'].pushNotification)).toString() ===
    '[object SafariRemoteNotification]'
  // Internet Explorer 6-11
  const isIE = !!window.ActiveXObject || 'ActiveXObject' in window || !!document.documentMode
  // 旧 Edge 20+
  const isEdge = !isIE && !!window.StyleMedia
  // Chrome 1 - 79
  const isChrome = !!window.chrome
  // 新 Edge
  const isEdgeChromium = isChrome && (navigator.userAgent.indexOf('Edg') != -1)
  // Blink 渲染引擎
  const isBlink = (isChrome || isOpera) && !!window.CSS

  return {
    isOpera, isFirefox, isSafari, isIE, isEdge, isChrome, isEdgeChromium, isBlink,
  }
}
HTML 防蜘蛛
都是防君子不防小人的方法
使用 HTML 标签,告诉搜索引擎不需要索引
<meta name="robots" content="noindex, nofollow"/>
使用 robots.txt
User-agent: *
Disallow: *
快速升级依赖
下列内容来自 ChatGPT 3.5
要快速升级已有的 package.json 文件中的依赖版本,可以按照以下步骤进行操作:
- 打开你的项目文件夹,在命令行终端中导航到该文件夹的路径。
- 运行
npm outdated 命令,它将显示项目中过时的依赖项及其当前版本和最新版本。这将帮助你确定需要升级的依赖项。
- 根据
npm outdated 的输出,确定你想要升级的依赖项。你可以选择升级所有过时的依赖项,或者只升级你感兴趣的特定依赖项。
- 运行
npm update <package-name> 命令来升级特定的依赖项。将 <package-name>
替换为你要升级的依赖项的名称。如果你要升级多个依赖项,可以在命令中列出它们的名称,用空格分隔。
例如:npm update package1 package2 package3
- 运行
npm install 命令来安装更新后的依赖项。这将根据 package.json 文件中的新版本信息来安装依赖项。
- 检查项目是否正常工作。有时,升级依赖项可能会导致项目出现问题。确保在升级后运行项目并进行测试,以确保一切正常。
请注意,升级依赖项可能会引入不兼容的更改,因此在升级之前最好先备份你的项目文件。此外,如果你的项目使用了锁定版本的机制(例如
package-lock.json 或 yarn.lock),请确保在升级依赖项之前更新这些锁定文件,以便正确解析依赖项的版本。
V8 GC 引擎
Chromium 和 Node.js 的 V8 引擎中的 GC (Garbage Collector) 引擎。
分代结构
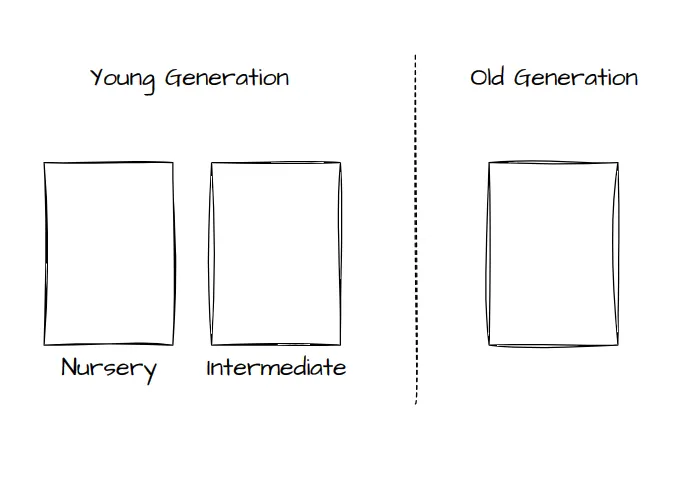
在 V8 中,堆空间会被分成两块区域,或者叫代(generation),分别叫做新生代(young generation)和老年代(old generation)
,而新生代由分为托儿所(nursery)和中间代(intermediate)。
GC 流程
Minor GC (Scavenger)
Minor GC 主要针对新生代进行垃圾回收。在这个过程中,主要有三个步骤:移动对象、清空托儿所和角色互换。
移动对象
在 Minor GC 过程中,V8 会检查新生代中的对象,将存活的对象移动到中间代或老年代。这样可以确保新生代中的空间得到充分利用,同时减少内存碎片。
如果对象是第一次被移动,会移动到中间带,并打上标记,在下一次移动时,被标记的对象会被直接移动到老年代。
清空托儿所
在移动存活对象之后,V8 会清空托儿所,将其内存空间归还给操作系统。这样一来,新生代中的空间就可以重新分配给新创建的对象。
角色互换
清空托儿所后,中间代和托儿所的角色会发生互换,原先的中间代会变成托儿所,托儿所会变成中间代。
Major GC (Mark Sweep & Mark Compack)
Major GC 主要针对老年代进行垃圾回收。这个过程主要包括三个步骤:GC ROOT、并发标记和并发清除与整理。
GC ROOT
在 Major GC 开始时,V8 会首先确定一组根对象(GC ROOT),这些对象是不会被垃圾回收的。通过遍历这些根对象,V8 可以找出所有与之相关的存活对象。
并发标记
在这个阶段,V8 会并行地遍历整个堆空间,标记出所有存活的对象。这个过程可以在 JavaScript 执行过程中并发进行,从而降低垃圾回收对应用程序性能的影响。
并发清除和整理
最后,V8 会清除那些没有被标记为存活的对象,并整理堆空间。这样可以确保内存空间得到充分利用,同时减少内存碎片。
复制内容添加水印
封装了一个 vue 的 hook,类似 csdn 的那种在复制文本时候添加特殊的水印,并且复制不会丢失原格式。
代码
/**
 * 复制文本添加水印
 * @param {HTMLElement|import('content/post/note/vue').Ref<HTMLElement>|import('vue').ComputedRef<HTMLElement>} target 监听的元素
 * @param {string|import('content/post/note/vue').Ref<string>|import('vue').ComputedRef<string>} watermark 水印内容(html格式)
 * @param {string|import('content/post/note/vue').Ref<string>|import('vue').ComputedRef<string>} [fallbackWatermark] 不支持html的回滚水印内容(文本格式)
 * @param {number|import('content/post/note/vue').Ref<number>|import('vue').ComputedRef<number>} [minTextLength] 添加水印的阈值
 */
export default function useCopyWatermark(target, { watermark, fallbackWatermark, minTextLength } = {}) {
  const watermarkText = computed(() => {
    const unwrappedFallbackWatermark = unref(fallbackWatermark)
    if (unwrappedFallbackWatermark) return unwrappedFallbackWatermark
    const watermarkEle = document.createElement('div')
    watermarkEle.innerHTML = unref(watermark)
    return watermarkEle.innerText
  })
  const copyHandler = (evt) => {
    const selection = window.getSelection()
    if (selection.toString().length < unref(minTextLength ?? 200)) return
    const helper = document.createElement('div')
    helper.appendChild(selection.getRangeAt(0).cloneContents())
    evt.clipboardData.setData('text/plain', helper.innerText + watermarkText.value)
    evt.clipboardData.setData('text/html', helper.innerHTML + unref(watermark))
    evt.preventDefault()
  }
  onMounted(() => unref(target)?.addEventListener('copy', copyHandler))
  onUnmounted(() => unref(target)?.removeEventListener('copy', copyHandler))
}
使用方法
<script setup>
const ele = ref()
const watermark = `<br/>
<p>————————————————</p>
<p>版权声明:本文为 blyrin 的原创文章,禁止一切未经授权的转载、发布、出售等行为,违者将被追究法律责任。</p>
<p>原文链接:<a href="https://example.org/abc">https://example.org/abc</p></a>`
useCopyWatermark(ele, { watermark })
</script>

<template>
  <div ref="ele"></div>
</template>